


This n8n Docker installation guide walks you through everything from running your first test container to building a secure, production-ready automation server. Docker is the fastest and most reliable way to deploy n8n, and with the right configuration your workflows, credentials and settings stay safe through every update.
🔑 Key Takeaways
- Docker is the recommended way to deploy n8n, giving you an isolated, portable and easy-to-update environment for workflow automation.
- Docker Compose with persistent volumes and environment variables keeps your workflows, credentials and configuration safe across container updates.
- A production-ready n8n Docker installation should include HTTPS, a reverse proxy, secure authentication, automatic backups and PostgreSQL.
n8n is one of the most popular open-source workflow automation platforms available today. It lets you connect applications, automate repetitive tasks, build APIs, synchronize data and create sophisticated workflows without writing extensive code.
Docker packages the application and its dependencies into lightweight containers, so installation is consistent across Linux, Windows and macOS. Whether you are a developer, DevOps engineer or business owner automating operations, an n8n Docker installation simplifies the entire deployment process.
This guide covers prerequisites, installation, Docker Compose, persistent storage, PostgreSQL, HTTPS, updates, backups, troubleshooting and security best practices.
☰ Table of Contents (click to expand)
- Why Choose an n8n Docker Installation?
- Prerequisites for n8n Docker Installation
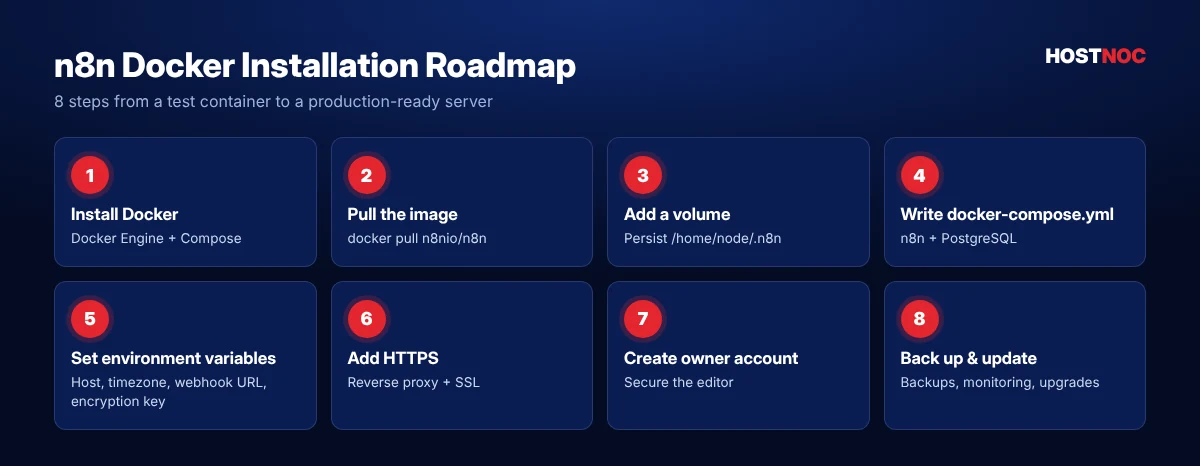
- Step 1: Install Docker
- Step 2: Pull the Latest n8n Docker Image
- Step 3: Run n8n for a Quick Test
- Step 4: Add Persistent Storage
- Step 5: Install n8n Using Docker Compose
- Step 6: Configure Environment Variables
- Step 7: Secure the n8n Editor
- Step 8: Configure HTTPS With a Reverse Proxy
- Managing Your n8n Docker Containers
- How to Update n8n in Docker
- Back Up Your n8n Installation
- Monitor Container Health
- Common n8n Docker Installation Problems
- Choosing a Server for Your n8n Docker Installation
- Scaling Your n8n Docker Installation With Queue Mode
- Best Practices for a Production n8n Docker Installation
- Conclusion
- n8n Docker Installation: Frequently Asked Questions
Why Choose an n8n Docker Installation?
Docker has become the standard deployment method for modern applications because it removes compatibility issues and simplifies maintenance. Major benefits include:
- Quick installation
- Easy upgrades and rollbacks
- Portable deployments
- Consistent environments
- Better security isolation
- Simple backup and recovery
- Efficient resource usage
Instead of manually installing Node.js, dependencies and system packages, Docker downloads a ready-to-use n8n image and launches it within minutes.
| Method | Setup Effort | Updates | Best For |
|---|---|---|---|
| Docker / Docker Compose | Low | Pull a new image | Most users and production servers |
| npm (Node.js) | Medium | npm update, manage Node versions | Local development and testing |
| Kubernetes | High | Rolling deployments | Large, highly available enterprise setups |
| Managed n8n hosting | None | Handled by the provider | Teams that do not want to manage servers |
Prerequisites for n8n Docker Installation
Before you begin, make sure your system has:
- Docker Engine installed
- Docker Compose (v2 plugin) installed
- At least 2 GB of RAM (4 GB recommended for production)
- 2 CPU cores
- A stable internet connection
- Terminal or command prompt access
- Administrator or root permissions
For production deployments, a domain name and a reverse proxy are strongly recommended. A Linux VPS with Ubuntu or Debian is the most common choice for running n8n in Docker.
Step 1: Install Docker
On Windows or macOS, download and install Docker Desktop. On Linux, install Docker Engine with your package manager or Docker’s official convenience script:
curl -fsSL https://get.docker.com | sudo sh
sudo usermod -aG docker $USER   # log out and back in afterwards
Verify that Docker and Docker Compose are working:
docker --version
docker compose version
If both commands return version information, you are ready to continue with your n8n Docker installation.
Step 2: Pull the Latest n8n Docker Image
n8n publishes official images to its own registry and Docker Hub. Download the latest image with:
docker pull docker.n8n.io/n8nio/n8nDocker downloads all required layers automatically, which usually takes a few minutes depending on your connection speed.
Step 3: Run n8n for a Quick Test
The simplest way to start n8n is a single docker run command:
docker run -it --rm -p 5678:5678 docker.n8n.io/n8nio/n8nOnce it starts, open http://localhost:5678 in your browser and the n8n editor will appear. However, this method is only for testing, because your workflows disappear as soon as the container stops.
Step 4: Add Persistent Storage
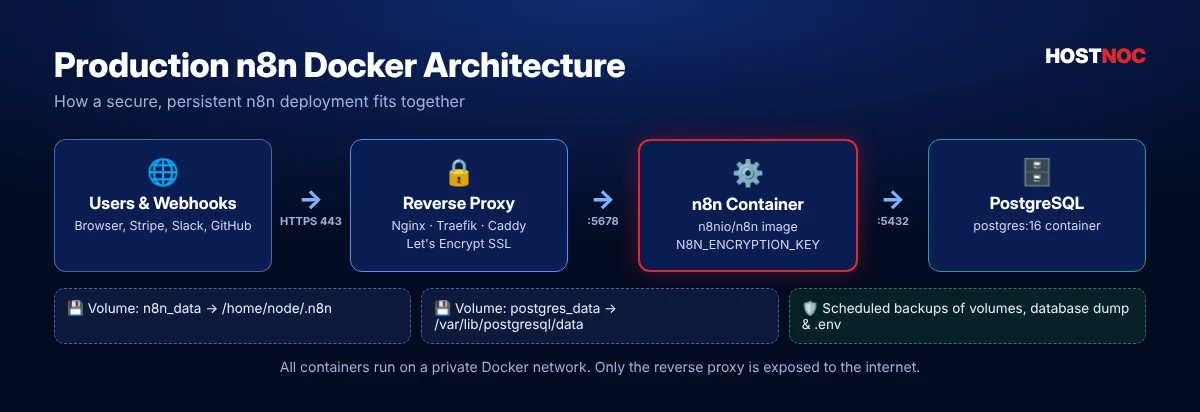
Containers are temporary by design. Without persistent storage you will lose your workflows, credentials, executions, user accounts and configuration whenever the container is removed. Docker volumes solve this by storing data outside the container.
docker volume create n8n_data

docker run -d --name n8n \
  -p 5678:5678 \
  -v n8n_data:/home/node/.n8n \
  docker.n8n.io/n8nio/n8n
Now your workflows remain intact even if the container restarts or is recreated.
HostNOC Tip: The folder /home/node/.n8n also contains n8n’s credential encryption key. Always back up this volume or set your own N8N_ENCRYPTION_KEY.
Step 5: Install n8n Using Docker Compose
Docker Compose is the recommended approach for any long-running n8n Docker installation because it keeps your configuration in one readable file. Create a project folder and two files: .env and docker-compose.yml.
mkdir ~/n8n && cd ~/n8n
nano .env
nano docker-compose.yml
The .env File
DOMAIN=automation.example.com
GENERIC_TIMEZONE=Asia/Karachi
N8N_ENCRYPTION_KEY=replace-with-openssl-rand-hex-32
POSTGRES_USER=n8n
POSTGRES_PASSWORD=replace-with-a-strong-password
POSTGRES_DB=n8n
The docker-compose.yml File
This production-ready example runs n8n with PostgreSQL and persistent volumes for both services:
services:
  postgres:
    image: postgres:16
    restart: always
    environment:
      - POSTGRES_USER=${POSTGRES_USER}
      - POSTGRES_PASSWORD=${POSTGRES_PASSWORD}
      - POSTGRES_DB=${POSTGRES_DB}
    volumes:
      - postgres_data:/var/lib/postgresql/data
    healthcheck:
      test: ["CMD-SHELL", "pg_isready -U ${POSTGRES_USER} -d ${POSTGRES_DB}"]
      interval: 10s
      retries: 5

  n8n:
    image: docker.n8n.io/n8nio/n8n
    restart: always
    ports:
      - "127.0.0.1:5678:5678"
    environment:
      - DB_TYPE=postgresdb
      - DB_POSTGRESDB_HOST=postgres
      - DB_POSTGRESDB_DATABASE=${POSTGRES_DB}
      - DB_POSTGRESDB_USER=${POSTGRES_USER}
      - DB_POSTGRESDB_PASSWORD=${POSTGRES_PASSWORD}
      - N8N_HOST=${DOMAIN}
      - N8N_PROTOCOL=https
      - WEBHOOK_URL=https://${DOMAIN}/
      - GENERIC_TIMEZONE=${GENERIC_TIMEZONE}
      - N8N_ENCRYPTION_KEY=${N8N_ENCRYPTION_KEY}
      - EXECUTIONS_DATA_PRUNE=true
      - EXECUTIONS_DATA_MAX_AGE=336
    volumes:
      - n8n_data:/home/node/.n8n
    depends_on:
      postgres:
        condition: service_healthy

volumes:
  n8n_data:
  postgres_data:
Start the stack and check that both containers are running:
docker compose up -d
docker ps
Binding port 5678 to 127.0.0.1 means n8n is reachable only from the server itself; your reverse proxy will handle public HTTPS traffic in the next step.
Understanding the Docker Compose Configuration
| Key | Purpose |
|---|---|
| `image` | Which n8n or PostgreSQL image Docker downloads |
| `restart: always` | Restarts containers automatically after crashes or reboots |
| `ports` | Maps container port 5678 to the host |
| `environment` | Application settings such as database, domain and timezone |
| `volumes` | Persistent storage that survives container updates |
| `depends_on` | Starts n8n only after PostgreSQL is healthy |
Step 6: Configure Environment Variables
Environment variables control how n8n behaves. The most important ones for an n8n Docker installation are:
| Variable | What It Does |
|---|---|
| `N8N_HOST` | The domain name n8n is served on |
| `N8N_PORT` | Internal port (default 5678) |
| `N8N_PROTOCOL` | http or https |
| `WEBHOOK_URL` | Public URL used to build webhook addresses behind a proxy |
| `GENERIC_TIMEZONE` | Timezone for Schedule Trigger and cron workflows |
| `N8N_ENCRYPTION_KEY` | Key used to encrypt stored credentials |
| `DB_TYPE` | Database type, for example postgresdb |
| `EXECUTIONS_DATA_PRUNE` | Automatically removes old execution data to save disk space |
Setting the correct timezone ensures scheduled workflows run at the times you expect, and WEBHOOK_URL is essential for services such as Slack, Stripe, GitHub and Discord to deliver webhook events correctly.
Step 7: Secure the n8n Editor
Exposing n8n without authentication is dangerous. Older guides recommend the N8N_BASIC_AUTH_* variables, but these were removed in n8n 1.0. Modern versions include built-in user management instead:
- Open your n8n URL as soon as the container starts.
- Create the owner account with a strong, unique password.
- Enable two-factor authentication in your user settings.
- Invite team members with the lowest role they need.
Do this immediately after deployment, before anyone else can reach the setup screen. For a complete hardening checklist, read our n8n hosting security best practices.
Step 8: Configure HTTPS With a Reverse Proxy
HTTPS encrypts all communication between users, webhooks and your server. Instead of exposing port 5678 directly, place n8n behind a reverse proxy such as Nginx, Traefik or Caddy. Benefits include free SSL certificates, automatic HTTPS, better security, load balancing and compression.
Caddy is the simplest option because it obtains and renews Let’s Encrypt certificates automatically:
automation.example.com {
    reverse_proxy 127.0.0.1:5678
}
Point your domain’s DNS A record to the server, reload Caddy and your n8n Docker installation is now served securely over HTTPS.
Skip the Setup With Managed n8n Hosting
Get n8n pre-installed with Docker, PostgreSQL, SSL and automated backups, plus 24/7 expert support.
Managing Your n8n Docker Containers
These commands are used frequently during deployment and troubleshooting:
| Task | Command |
|---|---|
| Start | docker compose up -d |
| Stop | docker compose down |
| Restart | docker compose restart |
| View logs | docker compose logs -f n8n |
| Running containers | docker ps |
| Resource usage | docker stats |
How to Update n8n in Docker
Updating an n8n Docker installation is straightforward and takes only a minute. Back up first, then pull the latest image and recreate the containers:
docker compose pull
docker compose up -d
docker image prune -f   # optional: remove old images
Because workflows and credentials live in persistent volumes, your data remains intact. Review the release notes before major version upgrades, and pin a specific version tag (for example n8nio/n8n:1.x.x) if you want full control over when upgrades happen.
Back Up Your n8n Installation
Never rely on Docker volumes alone. Create regular backups of your Docker volumes, PostgreSQL database, .env file (including the encryption key) and docker-compose.yml.
docker compose exec -T postgres pg_dump -U n8n n8n | gzip > n8n-db-$(date +%F).sql.gz
docker run --rm -v n8n_n8n_data:/data -v $(pwd):/backup alpine \
  tar czf /backup/n8n-data-$(date +%F).tar.gz -C /data .
Store backups off the server and test a restore regularly. Automated backups protect you against accidental deletion, ransomware and hardware failure.
Monitor Container Health
A healthy n8n Docker installation needs regular checks. Use docker ps to view running containers, docker stats to check CPU and memory usage and docker logs n8n to inspect errors. Monitoring helps you catch memory issues, crashes and unexpected restarts before they affect production workflows. For larger setups, add tools such as Uptime Kuma, Grafana or Prometheus.
Common n8n Docker Installation Problems
Container Stops Immediately
This is usually caused by incorrect environment variables, a database connection error or permission issues. Check the logs with docker logs n8n.
Port 5678 Already in Use
Another application is using the port. Change the host side of the port mapping, for example "8080:5678", and then visit http://localhost:8080.
Permission Errors
Linux users sometimes see permission errors when mounting a host folder. The n8n container runs as the node user (UID 1000), so give that user ownership: sudo chown -R 1000:1000 ./n8n_data.
Webhooks Not Working
WEBHOOK_URLis not configured- HTTPS is missing
- Reverse proxy headers are incorrect
- A firewall blocks incoming requests
Lost Workflows
If workflows disappear after restarting Docker, persistent storage was not configured correctly. Always mount /home/node/.n8n to a Docker volume or host directory.
Choosing a Server for Your n8n Docker Installation
Docker runs almost anywhere, but the server you choose decides how smoothly your n8n Docker installation performs once real workflows start running. Use these starting points:
| Workload | Recommended Server | Why |
|---|---|---|
| Testing and learning | Local machine or 2 GB VPS | Enough for a handful of simple workflows |
| Small business production | 2 vCPU, 4 GB RAM VPS | Comfortable headroom for PostgreSQL and webhooks |
| Growing automation team | 4 vCPU, 8 GB RAM VPS | Handles AI nodes, larger data sets and more executions |
| Enterprise / queue mode | Dedicated server or multiple VPS | Separate main, worker and Redis containers |
Choose NVMe storage where possible, because PostgreSQL and execution logs benefit greatly from fast disks. A data center close to the services your workflows call most often also reduces latency. HostNOC’s VPS servers and dedicated servers are well suited to Docker-based n8n deployments of every size.
Scaling Your n8n Docker Installation With Queue Mode
A single n8n container handles a surprising amount of work, but heavy webhook traffic or long-running AI workflows can eventually slow it down. Queue mode solves this by splitting n8n into a main instance, a Redis queue and one or more worker containers. You enable it with EXECUTIONS_MODE=queue and Redis connection settings, then add workers as demand grows. Because everything already runs in Docker Compose, scaling is often as simple as adding a worker service and running docker compose up -d again.
Best Practices for a Production n8n Docker Installation
- Enable HTTPS and never expose the editor directly to the internet without authentication.
- Use PostgreSQL instead of SQLite for better performance and reliability with many concurrent workflows.
- Schedule backups of workflow data, credentials, the encryption key and configuration files.
- Monitor resources such as CPU, memory, disk space and container logs.
- Keep images updated to receive bug fixes, security patches and new n8n features.
- Restrict access with firewalls, VPNs or private networks, and use strong passwords with MFA.
As your automation grows, you can move to queue mode with Redis and multiple worker containers. If you would rather avoid managing Docker yourself, compare the best n8n hosting providers or follow our guides on how to install n8n on a VPS and how to deploy n8n on Linux.
A good n8n Docker installation is invisible: it restarts itself, backs itself up and updates in minutes without losing a single workflow.
Conclusion
An n8n Docker installation is one of the fastest and most dependable ways to deploy a workflow automation platform. Docker eliminates dependency conflicts, simplifies updates and provides a consistent runtime across operating systems.
By combining Docker Compose, persistent volumes, secure environment variables, PostgreSQL, HTTPS and regular backups, you can build a scalable, production-ready automation server. Whether you are automating personal tasks or powering enterprise workflows, a properly configured Docker deployment gives you a reliable foundation that is easy to maintain, secure and expand.
Want n8n Running in Minutes?
HostNOC deploys and manages your n8n Docker stack so you can focus on building workflows.
FAQs
n8n Docker Installation: Frequently Asked Questions
Quick answers to the questions people ask most.
Is Docker the best way to install n8n?
Yes. Docker is the officially recommended deployment method because it simplifies installation, upgrades, backups and portability.
Can I run n8n without Docker?
Yes. You can install n8n with Node.js and npm, but Docker is generally easier to manage and maintain.
Is Docker Compose required?
No. You can run n8n with a single docker run command, but Docker Compose is recommended for long-term deployments.
Which database should I use?
SQLite is suitable for testing and small projects. PostgreSQL is recommended for production because of better scalability and reliability.
How do I update n8n?
Back up your data, run docker compose pull and then docker compose up -d. Persistent volumes keep your workflows and credentials intact.
How much RAM does n8n need?
A small personal installation can run with 2 GB of RAM, while production environments handling many workflows benefit from 4 GB or more.
Why are my workflows disappearing?
The data directory is usually not mounted to a persistent Docker volume. Make sure /home/node/.n8n is mapped correctly.
Can I use HTTPS with Docker?
Yes. Place n8n behind a reverse proxy such as Nginx, Traefik or Caddy with SSL certificates from Let’s Encrypt.
Is n8n free?
Yes. The self-hosted Community Edition is free to use under n8n’s fair-code license. Paid cloud and enterprise plans are available for managed hosting and extra features.
Can I run multiple n8n instances?
Yes. Multiple containers can run on the same server as long as they use different ports, separate databases or data directories and unique configuration.

Featured Post
n8n vs Zapier: Which One Should You Choose and Why?
n8n vs Zapier compared on ease of use, integrations, AI automation, pricing,...

n8n vs Make.com: Which Automation Platform Is Better?
n8n vs Make.com compared on ease of use, flexibility, integrations, AI automation,...
10 Best n8n Hosting Providers in 2026
Compare the 10 best n8n hosting providers in 2026, from managed n8n...
Follow us on:


Get the Latest News & Deals
Sign up to receive the latest news, updates and special offers from HostNOC.
I'd like to receive: